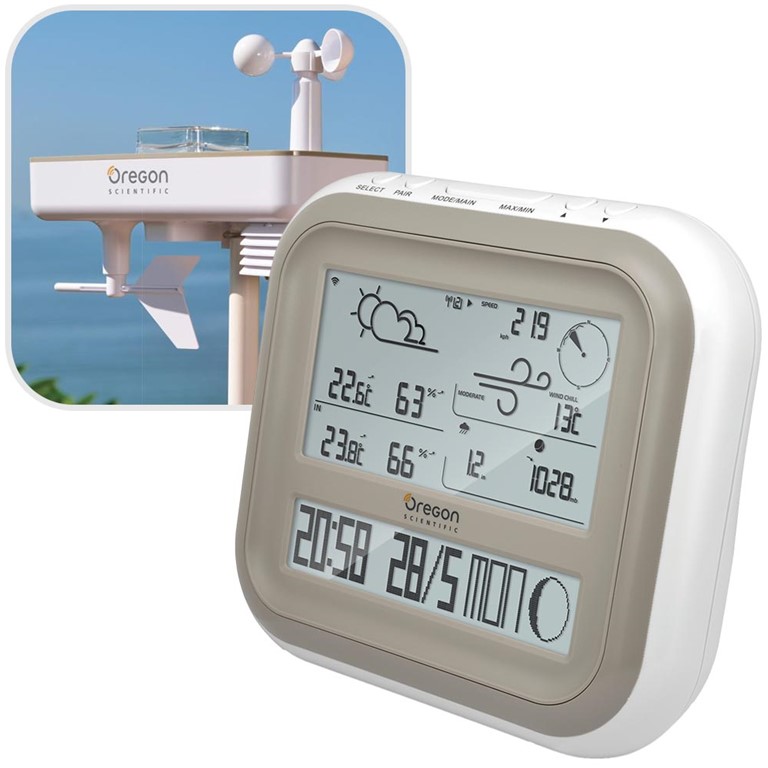
Oregon Scientific WMR500 Professional All-In-One Weather Station
Alternative Views:
Regular Price: $499.99
Our Price: $299.99
Savings: $
200.00
(40.00%)
Out Of Stock
 Free Shipping in the Contiguous U.S.
Additional 10% Off At Checkout
App Update: Oregon Scientific Smart Living WMR500 App available for iPhones, iPads and iPod touch only.

Oregon Scientific WMR500 Professional All-In-One Weather Station provides Smart Weather Monitoring with Greater Accuracy from the solar and battery powered sensor suite.
The Oregon Scientific WMR500 Professional All-in-one Weather Station offers a wide range of weather conditions, including temperature, humidity level, wind speed & direction, rainfall and barometric pressure.
The simple weather monitoring options, via the dedicated app, appear on the large WMR500 display console and your smart device. Track and compile long-term weather patterns while monitoring current trends.
A 2.4GHz (802.11g and 802.11b) wireless network is required for the WMR500 to connect to the internet. Most modern routers will transmit in both 2.4GHz and 5GHz (mixed mode). Please verify your local network (Wi-Fi connection) has this capability before ordering.
- Monitor local indoor and outdoor temperature, humidity level, barometric pressure, wind speed & direction and rainfall
- Large LCD console for easy to read results from the wireless weather station
- Supported by IoT new technology, connects with cloud computing
- Push notification/alert via cloud computing, compatible with any smart devices
- All weather sensors in one station design
- Comprehensive weather data, including barometric pressure, temperature with heat index (indoor and outdoor), humidity with dew-point (indoor and outdoor), rainfall, wind speed, wind direction
- High quality outdoor sensor system comply splash proof water resistance and solar panel to provide power and extend the life of the batteries.
- Big display and extra dot matrix display for comprehensive weather data and alert messages
- Set weather alerts on dedicated APP
- Cloud support to Access data recorded and shared by other users
- Automatic time sync with server
- Build-in Wifi & 868/915Mhz wireless technology connection.
- 300m (1000 feet) outdoor sensor transmission range
- At-a-Glance Professional Weather Station: WMR500 Professional All-in-one Weather Station has a large LCD screen which displays a range of weather information such as weather forecast, local temperature, humidity level, wind speed & direction and rainfall.
- Cloud Computing/Wireless Weather: Professional All-in-one Weather Station connects with in cloud for smart devices, end-user receives push notification from their smart devices if weather changes.
- Perfect Weather Station for aspiring and amateur meteorologists who love to study the weather, families in search of fully-loaded educational tools and active individuals who enjoy the outdoors and need to know their local weather conditions.
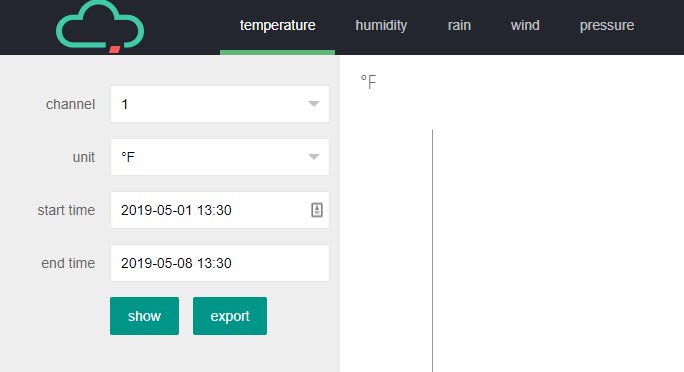
WMR500 Web App Data
The Oregon Scientific Store WMR500 Weather Station data. Click to login and view.
Username: [email protected]
Password: anywhere
Customer Reviews

5 stars out of 5
Showing comments 1-1 of 1
| Model Number | WMR500 |
| UPC | 4891475211918 |
| AC/DC Adapter | Input: 100-240 V, 50-60 Hz 300 mA Output: DC 5V, 1000 mA |
| Display type | LCD with dot matrix |
| Dimensions (L x W x H) | 180 x 90 x 160 mm (7 x 3.54 x 6.3 inches) |
| Weight | 427.5 g (0.94 lbs) without battery |
| Dimension | (L x W x H) 385 x 195 x 315 mm (15.16 x 7.68 x 12.4 inches) |
| Weight | 1139 g (2.51 lbs) without battery |
| RF transmission frequency | EU: 868mhz, US: 915mhz |
| No. of channel | 3 |
| RF transmission range | 250 - 300 m (internal antenna) |
| Transmission Cycle | 15 seconds |
| Battery | 12 months (4 x 1.5 V AA) |
| Unit | mb, inHg, mmHg and hPa |
| Measuring range | 700 – 1050 hPa |
| Accuracy | +/- 7 hPa |
| Altitude setting | Sea level - User setting for offset pressure to sea level |
| Weather display | Sunny, Partly Cloudy, Cloudy, Rainy and Snowy |
| Temperature unit | °C / °F (°C for EU, °F for US) |
| Measuring Range | -5 to 50 °C (23 – 122 °F) |
| Accuracy | 0 – 40 °C (32 – 104 °F): +/-1 °C (+/- 2 °F) -5 to 0 °C (23 – 32.0 °F): +/-2 °C (+/- 4 °F) 40 – 50 °C (104 – 122 °F): +/-2 °C (+/- 4 °F) |
| Resolution | 0.1 °C (0.2 °F) |
| Memory | Current, Min. and Max. |
| Measuring Range | 25 % - 90 % RH |
| Accuracy | 40 % - 80 % RH: +/-5 % RH 25 % - 40 % RH and 80 %- 90 %RH: +/-7 % RH |
| Resolution | 1 % |
| Memory | Current, Min and Max |
| Temp. unit | °C / °F (°C for EU, °F for US) |
| Measuring Range | -30 to 60 °C (-22 to 140 °F) |
| Accuracy | -20 to 0 °C: +/-2.0 °C (+/- 4.0 °F) 0 – 40 °C: +/-1.0 °C (+/- 2.0 °F) 40 – 50 °C: +/-2.0 °C (+/- 4.0 °F) 50 – 60 °C: +/- 3.0 °C (+/- 6.0 °F) |
| Temperature resolution | 0.1°C (0.2 °F) |
| Memory | Current, Min and Max |
| Wind speed unit | m/s, knots, kph, mph |
| Speed accuracy | 2 - 10 m/s (+/-2 m/s) 10 - 56 m/s (+/- 10%) |
| Direction resolution | 22.5 degree |
| Memory | Max wind speed |
| Rainfall unit | mm , inch (mm for EU, inch for US) |
| Rain rate unit | mm/hr and inch/hr |
| Measuring range for rainfall | 0 mm to 9999 mm (0-393.6 inches) |
| Measuring range for rain rate | 0, 0.04 in/hr (1mm/hr) to 40 in/hr (1016 mm/hr) |
| Accuracy | 0 - 15 mm (0 - 0.6”)/hr : +/- 1 mm/hr (0.04”) 15 - 991 mm/hr (0.6 - 39”) : +/- 10 % |
| Memory | Past 24 hrs, hourly from last memory reset |
Network 2.4GHz (Wi-Fi) Connection F.A.Q.s
*Console must be plugged in to ac adapter. Batteries are for backup only.
- A 2.4GHz (802.11g and 802.11b) wireless network is required for the WMR500 to connect to the internet. Most modern routers will transmit in both 2.4GHz and 5GHz (mixed mode).
- If the WMR500 fails to connect to your network, check that your router is providing a 2.4GHz network connection.
- Certain router manufacturers will allow seperate network names and/or login credentials for the 2.4GHz network and the 5GHz network provided by the Wi-Fi- router.
Reconnect To Network(Wi-Fi) After Firmware Update
*Console must be plugged in to ac adapter. Batteries must also be present for backup power. Proceed in order.
- After updating the firmware on the WMR500 display using the WMR500 app, the Network Connection icon in the top left corner of the WMR500 display will flash indicating it it searching for a network.
- To assist the WMR500 display in reconnecting to the network you intially configured, unplug the ac adapter from the back of the WMR500 display for about 5 seconds (backup batteries must be installed in WMR500 display).
- Reinsert the ac adapter plug into the back of the WMR500 display.
- The network icon should flash breifly (1 min) then remain solid indicating connection to the network.
- At this point you should be logged into the WMR500 app and the data should be transmitting to the server and visible on your handheld device or tablet (1 - 2 min).
Network Configuration Error
*Console must be plugged in to ac adapter. Batteries must also be present for backup power. Proceed in order.
- In the event the WMR500 app states "Network Configuration Error" during the pairing process, verify that you are connecting to a 2.4GHz network (required).
- Begin the Network Joining process again.
- Enter your network credentials into the WMR500 app on your handheld device or tablet when prompted and select Connect.
- The pairing countdown will stop on the bottom field of the WMR500 display and the network icon in the top left corner of the WMR500 display will flash indicating the display is searching for the network.
- While the WMR500 app is still showing the network configuration is taking place ("Internet connection takes about 1 - 3 minutes), unplug the ac adapter from the back of the WMR500 display for about 5 seconds (backup batteries must be installed in WMR500 display).
- Reinsert the ac adapter plug into the back of the WMR500 display.
- The network icon should flash breifly (1 min) then remain solid indicating connection to the network.
- If prompted you may need to re-enter your network credentials.
- At this point you should be logged into the WMR500 app and the data should be transmitting to the server and visible on your handheld device or tablet (1 - 2 min).
Sensor Pairing
*Console must be plugged in to ac adapter. Proceed in order.
- Select a channel on the sensor suite (located inside the battery compartment). We suggest channel one unless you have more than one sensor suite.
- Press and hold the Pair button on the WMR500 display for 3 seconds until the options for Wi-Fi Network Joining and Sensor Pairing display on the bottom of the screen.
- Press the Down Arrow button to navigate to (2) Sensor Pairing.
- With Sensor Pairing selected press the Pair button once to begin pairing the WMR500 display and sensor suite.
- On the WMR500 sensor suite, press the reset button once (located inside the battery compartment).
- The WMR500 display and sensor suite should connect with one minute.
Rain Sensor Not Recording Rainfall
*Proceed in order.
- Remove the self emptying rain bucket fromt the underside of the WMR500 sensor suite.
- Verify that the tape is removed from the self emptying rain bucket.
- Verify that the self emptying rain bucket is correctly installed by checking that the magnet on the side of the rain bucket is facing the reed switch. If the rain bucket is not correctly installed the magnet will not trigger the reed switch when the bucket dumps the water.
- Once the rain bucket is re-installed into the bottom of the sensor suite, pour a small amount of water into the top of the rain sensor until the bucket tips.
- Confirm on the WMR500 display that the rain sensor has transmitted the data and is showing an amount in the rainfall area of the WMR500 display.